
I came across a fair share of issues with slot car controllers over the years. Sadly, these are often overlooked until the moment they stop working.
In many cases, when this happens they are beyond repair, but thankfully, not always.
That is why I want to talk about several issues you can come across and how to address them properly.
Table of Contents
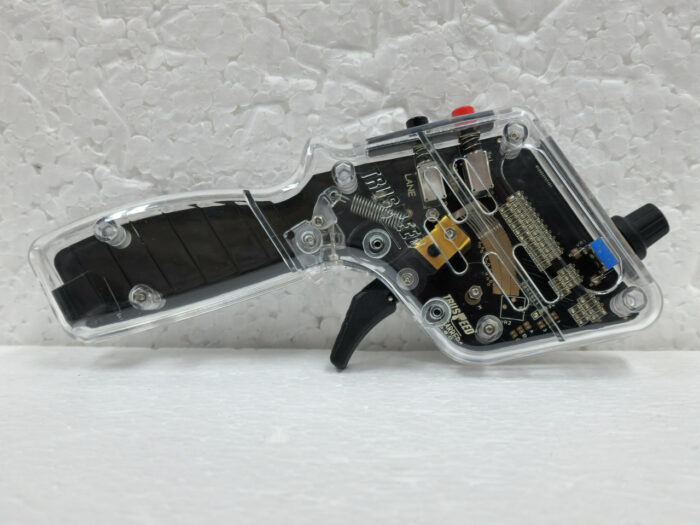
The Remote Controller Structure

Typically, a slot car controller consists of several key components:
- The trigger
- The resistor or electronic board
- Power contacts
- A braking mechanism
Each of these components plays a vital role in the controller’s functionality, and a clear understanding of how they work together is essential for diagnosing and fixing issues.
The Trigger
The trigger is the primary interface between the user and the slot car. It controls the amount of power sent to the car, acting as a variable switch.
When the trigger is pressed, it allows current to flow from the power source to the car. The further the trigger is pulled, the more power is sent, increasing the car’s speed. T
his simple yet crucial component is typically designed to provide smooth and precise control over the car’s acceleration.
The Resistor or Electronic Board
The resistor or electronic board is the heart of the power modulation system.
In traditional controllers, a resistor is used to vary the amount of power delivered to the car.
As the trigger is pressed, the resistor changes the resistance in the circuit, thereby adjusting the voltage and current sent to the car.
In modern controllers, electronic boards with sophisticated circuitry replace the resistor, offering more precise and efficient power control.
These boards may include integrated circuits (ICs), transistors, and other electronic components that enhance performance and reliability.
Power Contacts
Power contacts are responsible for transmitting electricity from the controller to the car.
These metal contacts connect with the track and the car’s pick-up shoes, creating an electrical pathway.
Ensuring these contacts are clean and in good condition is vital for consistent power delivery.
Dirty or corroded contacts can lead to power interruptions and erratic car behavior. Regular cleaning and maintenance of the power contacts are essential to keep the controller functioning smoothly.
The Braking Mechanism
The braking mechanism in a slot car controller is designed to stop the car when the trigger is released. It can be achieved through various methods, depending on the controller’s design.
Some controllers use a mechanical brake that engages when the trigger is fully released, while others use electronic braking systems.
The braking mechanism helps to slow down and stop the car, providing better control during races.
Knowing how the braking system works and maintaining it properly is crucial for optimal performance.
Common Issues and Troubleshooting Steps

Now, let me address the commonest issues and how you can find solutions.
Power Problems
Power problems are among the most common issues faced by slot car enthusiasts.
If your car gets no power until the trigger is pulled almost to full power, the issue might lie in the resistor or the power contacts.
Start by checking for any dirt or corrosion on the power contacts, as this can impede the flow of electricity.
Cleaning them with a contact cleaner can often resolve this issue. If the problem persists, the resistor might be worn out and need replacing.
If your car receives full power without pulling the trigger, this indicates a short circuit. Inspect the wiring for any obvious signs of wear or damage.
A multimeter can help identify where the short is occurring. Fixing this usually involves replacing the damaged wire or component.
Intermittent power issues can be frustrating. These are often caused by loose connections or broken wires.
Open the controller carefully, inspect all the connections, and re-solder any that are loose.
Ensuring all wires are securely attached can usually resolve these intermittent problems.
Braking Problems
Braking issues can also occur, such as intermittent brakes or brakes that only function when the trigger is fully engaged.
To troubleshoot, start by checking the brake contacts and wiring. Dirt or corrosion can prevent proper contact, so clean these areas thoroughly.
If the issue persists, the problem may lie within the brake mechanism itself. Disassemble the controller and inspect the brake system.
Look for any worn or damaged components that may need replacing. Sometimes, adjusting the tension of the brake mechanism can resolve the issue.
If a specific part is broken, sourcing a replacement part and carefully installing it should fix the problem.
Physical Damage
Physical damage to the controller can complicate repairs, especially if the controller is glued shut.
To open a glued controller without causing damage, use a sharp knife or a thin, flat tool to gently pry open the casing. Work slowly and carefully to avoid cracking the plastic.
Once open, inspect for broken wires or loose contacts.
Broken wires should be re-soldered, and loose contacts can be re-secured with small amounts of glue or tape. Ensure all repairs are secure before reassembling the controller.
Proper handling and careful disassembly are key to successfully repairing physically damaged controllers.
Advanced Repairs
If you encounter more severe issues, you should seek more advanced methods to repair them.
Soldering and Wiring
Soldering is a crucial skill for repairing slot car controllers. Start by gathering the necessary tools:
- A soldering iron
- Solder
- A desoldering pump or braid
When soldering, it’s important to handle delicate components carefully to avoid causing further damage.
First, identify the damaged wire or component. Use the soldering iron to heat the connection and apply the desoldering pump to remove the old solder.
Once the old solder is removed, position the new wire or component in place. Heat the connection again with the soldering iron and apply a new solder to secure it.
Ensure a clean, strong joint to prevent future issues.
Replacing Specific Components
Replacing specific components like transistors, resistors, and diodes requires some knowledge of electronics.
Start by identifying the faulty component. A multimeter can help test resistors and diodes for continuity and appropriate resistance values.
To replace a component, desolder the old part using the technique described earlier. Carefully insert the new component, ensuring it is oriented correctly (pay attention to polarity for diodes and transistors).
Solder the new part in place, making sure the connections are secure and free of cold solder joints.
Deciding whether to repair or replace a component depends on the extent of the damage and the availability of replacement parts.
Testing After Repairs
After completing repairs, testing the controller is essential to ensure it functions correctly.
Using a power supply, connect the controller and observe its performance.
Check if the trigger modulates the power smoothly, the brakes engage properly, and there are no intermittent power issues.
Bench testing involves simulating actual use. Connect the controller to a slot car track and run a car to see how it responds.
Pay attention to any irregularities in power delivery or braking.