
Permanent HO Slot Car layouts require a strong, sturdy table. This is especially true for landscaped layouts. A well-made table insures that track has a secure base that will not flex or warp the track, and will also prevent plaster landscaping from cracking.
This section describes the process involved in constructing a high quality racing layout table. See the Construction page for detailed photographs of the entire table building process.
36″ × 80″ Table
The first table described here is the easiest to build. It employs a standard 36″ × 80″ solid core exterior door as the base with a pair of folding banquet table legs attached to the underside.
This table can be constructed in a few hours, using only the simplest of hand tools; a tape measure, an electric hand drill and a screw driver.
The following building materials are required:
1 – 36″ × 80″ Solid Core Exterior Door
1 – Pair of Folding Banquet Table Legs
7 – Feet of 36″ Wide Carpet Runner (Optional)
If space is a concern, or you just need a table that easily folds up for storage this is a good choice. A table of this size can accommodate a 4-lane layout with a lap length of 25 to 30 feet, or a 2-lane racing circuit with a lap length of over 40 feet. See the Tuckaway section of this web site for an example of a 4-lane racing layout that will fit on this table top.
36″ wide carpet stair runner can easily be glued to this table top to provide a quite running racing layout. Select a dark green color to closely approximate the color of grass and eliminate the need for any other landscaping elements.
Tip If you can’t find folding banquet table legs locally you can order them directly from EBCO Products. They’re inexpensive and include free UPS Ground shipping.
4′ × 8′ Table
The 4 × 8 foot table described here is probably the most popular size for an HO Slot Car Racing layout. It uses stock lumber sizes available at any good lumber yard or building supply center.
A table of this size can easily accommodate a 4-lane racing layout with laps lengths of 30 to 40 feet. See the Layouts page of this web site for several racing layouts that will fit on this table.
The following building materials are required:
1 – 4′ × 8′ × 5/8″ Plywood Sheet
5 – 1″ × 4″ × 8′ Boards
1 – 4″ × 4″ × 12′ Post
1 – 4′ × 8′ × 1/2″ Homasote (Optional)
This table can be built using common hand tools and a miter box. Use the miter box to accurately cut the 1″ × 4″ boards to the proper lengths. A miter box guarantees that all of the cuts you make will be square. See the Construction section for detailed photographs of the table building process.
This table’s legs are made by cutting a 12 foot 4″ × 4″ into four 30″ lengths. Adjustable feet can be added to level the table surface. Threaded leveling feet can be purchased at most hardware stores or building supply centers.
If younger racers will be using this table you can reduce the height of the table legs from 30″ to something in the 24″ to 28″ range instead.
4′ × 12′ Table
The 4 × 12 foot table described here is the most popular size for an HO Slot Car Racing club layout. It uses stock lumber sizes available at any good lumber yard or building supply center.
A table of this size can easily accommodate a 4-lane racing layout with laps lengths of 40 to 50 feet. See the Layouts section of this web site for several racing layouts that will fit on this 4 × 12 table.
The following building materials are required:
1 – 4′ × 8′ × 5/8″ Plywood Sheet
1 – 4′ × 4′ × 5/8″ Plywood Sheet
2 – 1″ × 4″ × 12′ Boards
3 – 1″ × 4″ × 8′ Boards
1 – 2″ × 4″ × 4′ Board
1 – 4″ × 4″ × 12′ Post
1 – 4′ × 8′ × 1/2″ Homasote (Optional)
1 – 4′ × 4′ × 1/2″ Homasote (Optional)
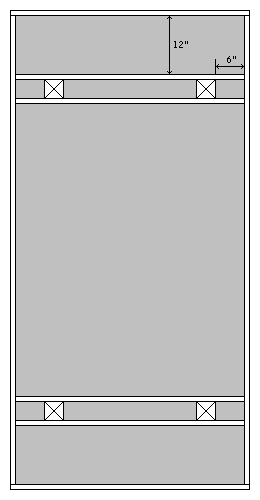
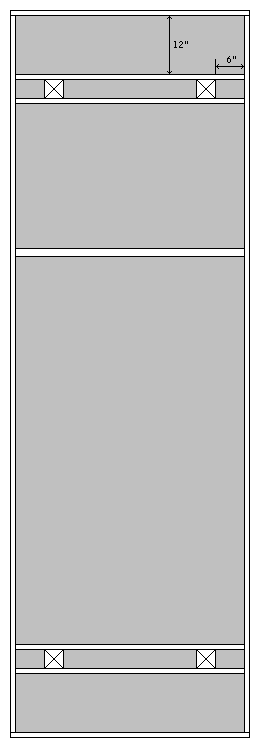
Construct the table frame as illustrated below. The butt joint between the 4×4 and 4×8 foot plywood sheets requires a 2×4 frame cross brace. For a smoother and quieter running race track glue the optional sheets of soundboard (Homasote) to the top of the table. This will greatly reduce the click-clack sound that plastic track sections make when mounted directly to a wooden table top.
This table can be built using common hand tools and a miter box. Use the miter box to accurately cut the 1″ × 4″ and 2″ × 4″ boards to the proper lengths. A miter box guarantees that all of the cuts you make will be square. See the Construction section for detailed photographs of the table building process.
This table’s legs are made by cutting a 12 foot 4″ × 4″ into four 30″ lengths. Adjustable feet can be added to level the table surface. Threaded leveling feet can be purchased at most hardware stores or building supply centers.
5′ × 9′ Table
The 5 × 9 foot table described here is based on a single sheet of plywood used to construct a standard-sized Ping-Pong table. If your local lumber yard or building supply center does not carry this size of plywood check the Yellow Pages under Plywood for a supplier that does.
A table of this size can easily accommodate a 4-lane racing layout with laps lengths of 45 to 55 feet. If you have the additional room this table requires by all means build a 5 × 9 foot table instead of the standard 4 × 8 foot size. The additional table width will provide enough extra space for another straight. The added length will also allow for faster, longer straight-aways. See the Layouts section of this web site for several racing layouts that will fit on this table.
The following building materials are required:
1 – 5′ × 9′ × 5/8″ Plywood Sheet
5 – 1″ × 4″ × 10′ Boards
1 – 4″ × 4″ × 12′ Post
2 – 4′ × 8′ × 1/2″ Homasote (Optional)
This table can be built using common hand tools and a miter box. Use the miter box to accurately cut the 1″ × 4″ boards to the proper lengths. A miter box guarantees that all of the cuts you make will be square. See the Construction section for detailed photographs of the table building process.
This table’s legs are made by cutting a 12 foot 4″ × 4″ into four 30″ lengths. Adjustable feet can be added to level the table surface. Threaded leveling feet can be purchased at most hardware stores or building supply centers.
If younger racers will be using this table you can reduce the height of the table legs from 30″ to something in the 24″ to 28″ range instead.
5′ × 10′ Table
The 5 × 10 foot table described here is also based on a single sheet of plywood. If your local lumber yard or building supply center does not carry this size of plywood check the Yellow Pages under Plywood for a supplier that does. In some area of the country 5 × 5 foot plywood sheets are available. Two of these smaller sheets can be combined to form a 5 × 10 platform if full sheets are not available.
A table of this size can easily accommodate a 4-lane racing layout with laps lengths of 50 to 60 feet. If you have the additional room this table requires by all means build a 5 × 10 foot table instead of the standard 4 × 8 foot size. The additional table width will provide enough extra space for another straight. The added length will also allow for faster, longer straight-aways. See the Layouts section of this web site for several racing layouts that will fit on this table.
The following building materials are required:
1 – 5′ × 10′ × 5/8″ Plywood Sheet (or)
2 – 5′ × 5′ × 5/8″ Plywood Sheets
5 – 1″ × 4″ × 10′ Boards
1 – 4″ × 4″ × 12′ Post
2 – 4′ × 8′ × 1/2″ Homasote (Optional)
Note If your local building supply store or lumber yard does not have 5×10 foot plywood sheets they may sell 5×5 foot sheets instead. Two of these sheets can easily be combined to create a 5×10 foot table.
This table can be built using common hand tools and a miter box. Use the miter box to accurately cut the 1″ × 4″ boards to the proper lengths. A miter box guarantees that all of the cuts you make will be square.
This table’s legs are made by cutting a 12 foot 4″ × 4″ into four 30″ lengths. Adjustable feet can be added to level the table surface. Threaded leveling feet can be purchased at most hardware stores or building supply centers.
5’4″ × 12′ Table
If you have the room for a larger HO Slot Car layout this is a good table to build. It uses two 4′ × 8′ pieces of plywood cut in such a way as to eliminate any wasted material. A table of this size can easily accommodate a 4-lane racing layout with lap lengths of 60 to 75 feet. See the Layouts section of this web site for several racing layouts that will fit on this table.
The following building materials are required:
2 – 4′ x 8′ x 5/8″ Plywood Sheets
5 – 1″ x 4″ x 12′ Boards
3 – 2″ x 4″ x 6′ Board
1 – 4″ x 4″ x 12′ Post
2 – 4′ x 8′ x 1/2″ Homasote (Optional)
Construct the table frame as illustrated below. The butt joints between the 32″ and 64″ plywood sheets require 2×4 frame cross braces in the center of the table. For a smoother and quieter running race track glue the optional sheets of soundboard (Homasote) to the top of the table. This will greatly reduce the click-clack sound that plastic track sections make when mounted directly to a wooden table top.
The diagram below illustrates how to cut the two plywood sheets to eliminate any wasted material.
This table can be built using common hand tools and a miter box. Use the miter box to accurately cut the 1″ × 4″ and 2″ × 4″ boards to the proper lengths. A miter box guarantees that all of the cuts you make will be square.
This table’s legs are made by cutting a 12 foot 4″ × 4″ into four 30″ lengths. Adjustable feet can be added to level the table surface. Threaded leveling feet can be purchased at most hardware stores or building supply centers.
Construction Techniques
The tables described in this section can all be built using simple hand tools. A miter box should be used to cut all dimensional lumber to the exact sizes required for the frame. This will guarantee that your saw cuts are square and true. See the Construction section for detailed photographs of the table building process.
The 5’4″ × 12′ Table requires that the plywood sheets to be cut into 64″ and 32″ sections though. Your lumber yard can normally make these cuts for a nominal fee. Having the lumber yard cut the plywood for you also makes it much easier to transport.
Dimensional lumber used to construct table frames should be glued and fastened using No. 6 wood screws. Avoid using nails as they will loosen with age. The plywood used for the table top should also be glued and fastened to the frame using No. 6 wood screws. Use flat-head screws and countersink all holes.
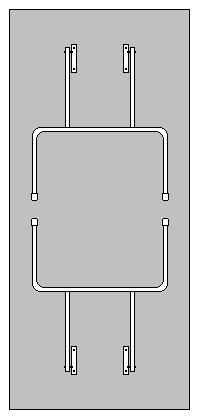
All of the plywood tables described in this section use the cantilever principle for leg support. Instead of placing the table legs at the outside corners, they are moved in 6 to 12 inches from the table’s edge. This method greatly increases the tables strength and prevents sagging due to the reduced load bearing spans involved. The additional four inner cross braces this table design uses provides extra points to fasten down the plywood table top.
On a typical 5×9 foot table the cantilever method effectively reduces the table top spans to 3 ½ and 6 feet.
The diagram above illustrates the cantilever principle used for each of the four corners of the table. The plywood table top is then fastened to this frame so that the edges are flush with the sides of the table frame. For added strength the plywood sheet should be fastened to both the outer frame and the inner leg support cross braces.
Mounting the plywood sheet flush with the table’s frame will also allow for additional 1×10″ dimensional lumber to be secured to the outside of the frame, creating a retaining wall around the entire circuit. If you elect to incorporate a retaining wall to keep your slot cars from landing on the floor fasten 1×10″ lumber to the outside table frame so that the bottom is flush with the 1×4″ framing. This will provide a 5 ½ inch lip around the entire table top, high enough to keep cars from leaving the table when they de-slot.
Plastic track sections normally produce a click-clack sound when fastened directly to a wooden table top. To reduce this sound, and produce a quite running race track, glue soundboard to the table surface. Paint the sound board a forest green to replicate the look of grass and foliage.
Use a good grade of exterior wood glue for all fastened surfaces. Exterior wood glue will resist the humidity often found in basements and garages.
Plywood sheets should be at least 1/2″ in thickness. Thinner material will flex and warp your track. Thicker plywood sheets can be used, but 3/4″ plywood is expensive and can get very heavy. Purchase good quality plywood, finished on both sides. The extra $5.00 or $10.00 spent here will greatly reduce the problems involved in trying to paint and finish inferior grades of plywood.
Do not use composition board or MDF in place of plywood for the table top.
While MDF is less expensive than plywood it will invariably break or chip with age. Invest in plywood, it is well worth the slight added expense.
If your table is to be located in a damp area, such as a basement or garage, you should seal it using a good quality oil based sealer. Avoid Latex based sealers though, as they do not work well when used to seal plywood or dimensional lumber.
Purchase threaded leveling feet and install them in the centers of the 4″ × 4″ table legs. These feet have threaded posts that can be adjusted to level your racing table much like the adjustable feet found on kitchen or laundry appliances.
A well-built table will greatly increase your racing enjoyment. You may change your racing layout’s configuration over the years, but a well made table will provide a solid base and should last a lifetime if constructed well.