
STrak is a modular slot car track system similar to the NTrak modules that are popular with model railroading hobbyists. STrak provides a standard module system that can be combined with other STrak modules to create large HO Slot Car tracks.
Each STrak module is 3×4 foot in size, and can be combined with other STrak modules to create much larger 4-lane raceways. Modules built by several different people can be combined to create fully landscaped slot car tracks.
Slot car clubs or groups of racers can combine STrak modules at swap meets and slot car shows or for weekly race events.
Each STrak module is small and lightweight, and can easily be stored when not in use. The small 3×4 foot size also makes it easy to transport several modules in a car or minivan.
STrak modules are built using standard Tomy A/FX or Tyco/Mattel plastic sectional track.
Specifications
STrak modules are easy to build. A simple, but sturdy 3′ x 4′ frame made from 1×4 dimensional lumber forms the structural frame. A 3′ x 4′ foot plywood sheet is then fastened to this base to create a strong but lightweight module.
Other materials such as 2″ foam insulation board or Homasote can also be used in place of the plywood top, but 1/4″ plywood is the best choice for modules that will be moved or stored on a regular basis.
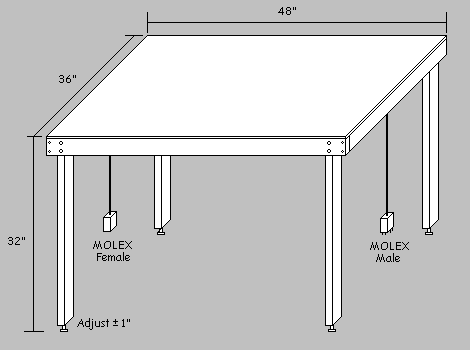
STrak modules sit on adjustable legs that create an overall height of 32″ from the floor to the top of the table surface. Adjustable legs allow for minor height adjustments when joining two or more modules together.
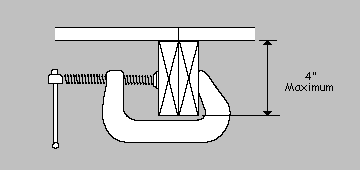
STrak modules can easily be joined end-to-end using simple 3″ “C” clamps as illustrated below. Two “C” clamps on each end of an STrak module will tie it securely to an adjoining module.
Electrical Connections
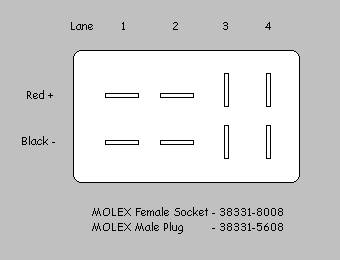
STrak modules share a common power distribution system. A Molex 8-Position polarized electrical connector is used at each end of the module. The left side of the module has a female socket and the right side a male plug. The connecting cables at each end of an STrak module should be a minimum of one (1) foot in length.
Molex connectors are widely available through electronics parts houses and online at www.Mouser.com. Molex connectors are sturdy, reliable and can carry high current loads.
Several STrak modules can be connected in a daisy-chain fashion by plugging the polarized Molex connectors at each end of a module into the respective connector on the modules on either side of it.
Track Location
STrak modules can be built using any brand of HO track. A 3″ gap at each end of module allows for a 6″ track section to be used to span the gap between two adjoining modules. 6″ Life-Like adapter tracks can also be used to join to modules that are built using different brands of track.
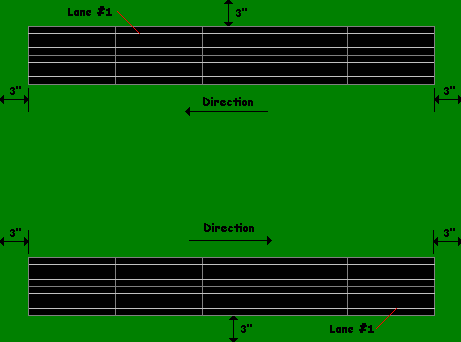
A 3″ offset at both the front and back edges of the module must also be maintained. Lane 1 is always on the outside edge of the module.
Joining Modules
STrak modules are placed end-to-end with 6″ track sections spanning the module joints as illustrated below.
STrak modules built using different brands of track can substitute 6″ Life-Like track adapters for the 6″ track sections spanning two modules. This approach allows Tomy A/FX and Tyco/Mattel modules to be combined.
STrak Module Examples
STrak modules can be as simple as the straight and 180 degree turn modules illustrated below, or more complex as those that follow them. You can also design your own modules, just remember to keep the 3″ gap at the ends of each module, and the 3″ setback from the front and back edges.
Following these simples rules will assure that your STrak modules can be combined with STrak modules built by other racers.
Straight Module
The STrak straight module is the simplest of all STrak modules. Most STrak configurations will incorporate several of these easy-to-build modules.
180 Turn Module
The STrak 180 degree turn module is the simplest turn module. It is comprised of a constant radius turn using 12″ and 15″ radius turns to create a 180 degree turn.
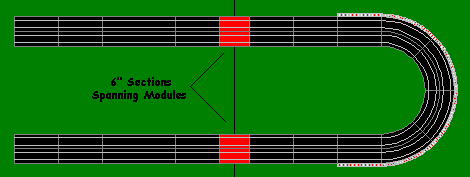
Two STrak 180 degree turn modules can be combined to create a simple NASCAR oval. This is the simplest raceway you can build by combining two STrak modules.
Note the 6″ connector tracks (in red) used to join the STrak modules.
More complex STrak modules can also be built. These modules provide for a more varied and challenging raceway, not to mention offering interesting landscaping possibilities.
Bus Stop Module
A classic Bus Stop chicane can be built as an STrak module. This turn complex adds challenge and variety to any STrak raceway.
Hairpin Module
A hairpin turn can be built as an STrak end module. Tomy A/FX 6″ and 9″ radius turns form a tight hairpin at the end of a long straight.
Cork Screw Module
A cork screw turn complex makes an interesting and challenging STrak end module. This particular configuration provides for interesting landscaping possibilities.
Chicane Module
A chicane module provides a nice series of “S” turns. This type of STrak module also offers interesting landscaping possibilities.
Parabolic Module
A parabolic turn module provides an interesting increasing or decreasing radius turn complex.
STrak Corner Modules
Up until now all of the STrak modules described here have been linear. STrak Corner modules make it possible to build raceways in “L” and “U” shaped configurations. STrak corner modules make it possible to build longer raceways that are folded back onto themselves to make better use of limited floor space.
STrak modules that incorporate corner modules can also be arranged along two walls and a corner in smaller rooms.
4’x4′ Corner Module
The 4′ x 4′ STrak corner module is built the same way as any standard 3′ x 4′ module. The inside corner of the platform however is cut on the diagonal resulting in two joining edges 36″ in width. These 36″ edges mate up with other STrak modules to form a 90 corner.
3″ gaps and offsets at the edges of the module must be maintained to allow standard 3’x4′ STrak modules to be attached using 6″ spanning straight track sections, just as normal STrak modules are joined.
3’x4′ Corner Module
The 3′ x 4′ STrak corner module is identical to a standard 3′ x 4′ module, except that the track is laid out in such a way as to form a 90 corner.
STrak Raceway Example
Combining standard STrak modules to create larger raceways is a simple matter of joining several modules together.
The example shown below uses three standard 3×4 STrak modules; A Cork Screw, Chicane and Hairpin module, along with a 4×4 corner STrak module to form an 8′ x 12′ L-Shaped raceway.
This raceway would be ideal for an individual racer with limited space, or for a small racing club.
STrak 8×12 L-Shaped Raceway
STrak Module Options
For those racers and clubs that plan on landscaping their STrak modules, an optional Retaining Wall applied to the front of an STrak module and a rear Sky Board can be added.
The optional Retaining Wall and Sky Board are applied to the outside edges of a standard STrak module, thus maintaining the full 36″ platform depth for the track.
For ease of transport these optional uprights can be designed to be removable.
Along with adding realism to an STrak module, these two visual devices will also serve to keep slot cars on the table and off of the floor when they de-slot.
STrak Module Construction
STrak modules can be constructed using a light-weight 1″x4″ frame as show below. Removable leg assemblies provide for easy transport and storage. A 1/4″ plywood sheet cut to 36″ x 48″ can be fastened to the frame with glue and No. 6 wood screws to form a strong and rigid STrak module that will stand up to many years of use.
Removable leg assemblies can be made using 2″x4″ lumber with a 1″x4″ cross brace running along the bottom for stability. Drill 1/2″ holes at the tops of the legs and in the module frame cross members so that 1/2″ bolts, fender washers and wing nuts can be used to secure the legs in place when the module is set up.
The STrak 4′ x 4′ Corner module is constructed using the same type of 1×4 frame as a standard STrak module. The rear or the frame is 48″ in length instead of the 36″ length of a normal module. A single 4′ x 4′ sheet of plywood is fastened to the corner frame in the same manner as a regular module. The inside corner of the plywood sheet is cut on an angle to fit the framing.
STrak Module Wiring
All STrak module wiring is concealed in the underside of the module frame itself. An 8-position barrier terminal block on each end of the module provides a neat and safe way of connecting the wires that form the main power buss, along with a means of connecting the wires that lead to the male and female Molex connectors required for connection to other STrak Modules.
The main power buss running the length of each STrak module should use 16 gauge or greater wire.
The wiring schematic below illustrates how a typical STrak module should be wired for safe and consistent power to all four lanes. Both the front and rear track sections are powered by running wires from the main power buss to the respective lanes.
The drawing below is shown as it will appear from the bottom side of the STrak module while you are actually wiring it. The upper edge of the drawing is the front of the module. Pay close attention to the lane #1 power taps. Lane #1 is always on the outside edge of an STrak module.
STrak modules are wired so that the cars travel left to right along the front track sections and right to left along the rear tracks.
A Molex Female Socket is attached to the left edge of an STrak module, and a Molex Male Plug is attached to the right side of the module.
The diagram below shows how both Male and Female Molex connectors are to be wired for compatibility with other STrak modules.
STrak Molex Wiring
STrak modules are wired so that 3-wire hand controls with brakes can be used. 3-Wire brake circuits require that each lane have its own positive (+) and negative (-) power supplied to the rails.
Standard Tomy A/FX and Tyco/Mattel power tracks can not be used due to their shared common negative rail.
Power is brought up from the underside of the table for each individual lane and short feeder wires are soldered to the underside of standard plastic sectional track.
STrak Wiring Adapters
STrak modules, by their very nature are reversible. The symmetrical design of an STrak module allows it to be inserted into most larger raceway layouts in either a left-to-right or right-to-left configuration depending upon how you’re combining it in a larger layout.
If an STrak module is “flipped” the Molex connectors at each end of the module will be opposite those of other adjoining modules.
Simple STrak adapter cables can be built to allow for connection to other modules with mis-matched plugs.
A short length of cable with a Male Molex plug on each end, and a cable with a Female Molex socket at each end will allow you to always have the “right” gender when connecting mis-matched STrak modules.
STrak Lane Colors
In keeping with the HOPRA lane color-coding specifications the outer Lane #1 is Red, Lane #2 is White, Lane #3 Blue, and the innermost Lane #4 is Yellow. Due to the symmetrical nature of STrak modules, lane color-coding will remain consistent regardless of how an STrak module is inserted into a larger raceway.
Clubs that plan to landscape their STrak modules may eliminate the color-coded lane tape due to its unrealistic appearance when creating a authentic landscaped scene.
If full lane coloring isn’t desired, then small pieces of colored tape no larger than 1/8″ by 1/4″ should be used at the exits of corners, or at other areas of the track where cars may de-slot. This will provide corner marshals with a means of identifying lanes without disturbing the realism of the scene.
STrak Drivers Stations & Power
The STrak modular track system uses a standard 8-wire power buss running down the center of each of the individual STrak modules. This 8-wire power buss provides isolated power for each of the 4 lanes.
If you’ve built your STrak modules following the specifications described above you’ll have several STrak modules, each with a pair of Male/Female Molex connectors at the ends of the modules.
The two (2) STrak modules at the ends of your assembled layout will each have an unused Molex connector at the end of the module that is not joined to another module.
These unused Molex connectors are used to apply power to the raceway.
The wiring diagram shown below illustrates how power supplies, drivers stations and hand controls are connected to an STrak modular raceway.
An 18 VDC power source is connected at the left side of the wiring schematic shown above. Individual power packs or a single high-output power supply can be used.
The 3-position barrier terminal blocks shown along the bottom edge of the wiring schematic are where 3-wire drivers stations and hand controls are connected.
The 8-position barrier terminal block shown at the right side of the drawing is where you attach a cable with a Molex Female Socket. The Molex connector is wired in exactly the same manner as the connectors used on a standard STrak module.
The drawing below shows a suggested 4-lane drivers station suitable for use with an STrak layout. The drivers station pedestal is free-standing and can easily be moved and stored when not in use.
The 12″ hollow box provides a convenient place to conceal the drivers station wiring and the power supply itself. The 12″ platform that the drivers stations are mounted on also provides enough room to set the hand controls down, along with a few extra cars and tools.
A free-standing drivers station area also provides a means of keeping the hand controls, extra cars and tools away from the track itself, which can be important when racing on fully landscaped STrak modules. A free-standing drivers station area also allows for placement away from the track to provide an unobstructed view of the entire raceway by all drivers.
A cable with a Molex Female Socket exits the drivers station pedestal and is plugged into the last STrak module on the right side of the assembled raceway.